

A few weeks ago, we found out we couldn’t get a dog. Despite owning our apartment, the by-laws state that dogs are not allowed in the building. So we got a cat and we named him Burt Reynolds (because of his bushy white mustache). Just like the real Burt Reynolds, our cat only wants two things: affection and turkey giblets in sauce. Given his proclivity to scratch our carpets and hang out on window sills, I got the sense he needed a domain to call his own. Rather than spend $134.99 on an ugly plastic cat tower I decided to build my own ever since I’ve been on a DIY kick, having recently built a dining room table for our new apartment (with a matching bench in the works). Using some plywood, carpet, sisal rope, a garbage can, a broom head and minimal tools, I was able to create a deluxe 3-tier cat tower with a self-service “cat wash” station for under $50. Details below.
 Print
Print
5′ x 2′ Piece of Plywood, 1/2″ thick ($5)
5′ x 2′ Carpet ($14)
2′ x 4′ Wood [at least 45″ long] ($3)
50 ft of 3/8″-thick Sisal Rope ($10)
#8 x 2″ Wood screws [Qty 12] ($3)
1/2″ long staples [Qty 200?] ($3)
1 plastic garbage can ($5)
1 broom head [at least 18″ long] ($6)
Tools:
Power Drill
Staple Gun
Handsaw
Hammer
Directions:
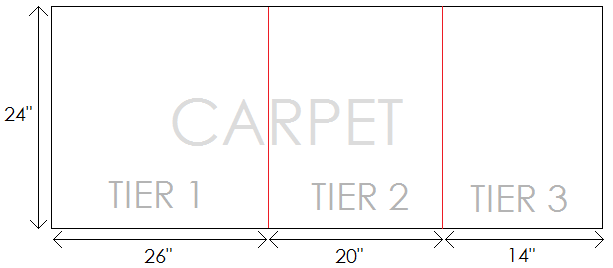
1. Cut the plywood along the red lines shown below (Click to enlarge):

2. Cut the carpet along the red lines shown below (Click to enlarge):
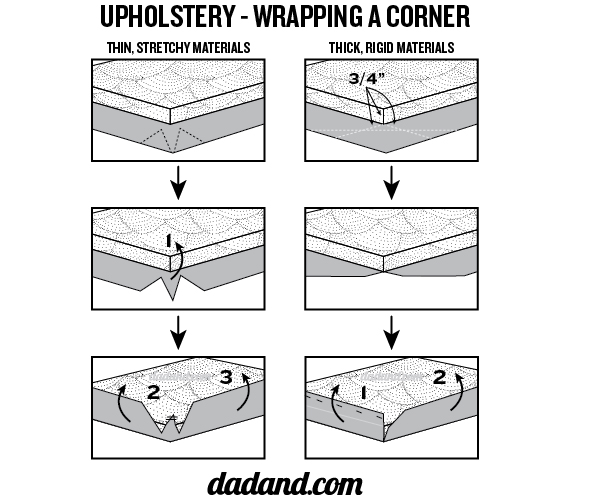
3. Wrap the first and second tiers (not the third yet) with carpet by overlapping 2″ of carpet on each side (except the base piece, which only overlaps on 2 sides). To make things easier, cut the carpet corners according to the upholstery guide below for thick, rigid materials (source: dadand.com). Use the staple gun to secure the carpet underneath, and a hammer to drive them in all the way.
4. Cut the 2′ x 4′ into a 15″ piece and a 30″ piece. Wrap the short post with 25 ft of sisal rope and one half of the long post with the other 25 ft. Use the staple gun to attach the ends of the rope to the post (about 3 staples at each end should suffice). Use the hammer to drive the staples in all the way, if necessary.
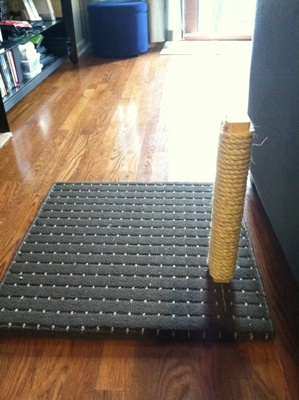
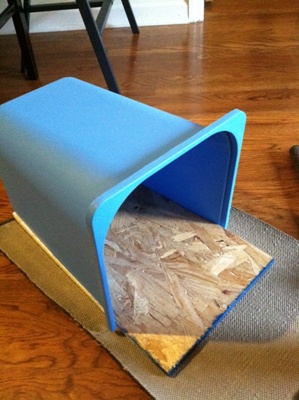
5. Drill pilot holes through the first tier where you want to attach the short post. Then screw the short post down, like this:
6. Cut the broom head into a 12″ and 6″ piece, sanding if necessary to remove extra bumps, and screw the 12″ piece to the long post. Drill more pilot holes in the first tier where you want to attach the long post. Then screw the long post down. Attach the second tier by screwing 2 screws down into the short post and 2 screws sideways through the long post. Also make sure to attach the 6″ broom head underneath the second tier. See picture below:

7. The third tier is a little tricky, so read the next steps a few times. Take the garbage can and cut off one side, then place it onto the third tier and trace the edges (sides only, not the top), aligning the bottom of the garbage can with one end of the tier. Use the handsaw to cut along the lines. Then, turn the third tier’s carpet upside-down on the floor. Place the wood on top and the garbage can on top of that. See the image below:
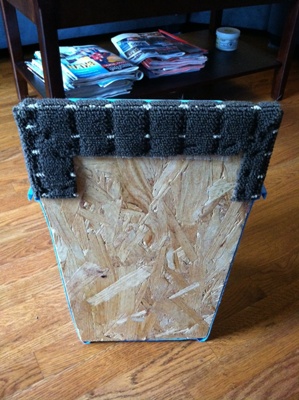
8. Trace out the third tier on the carpet, leaving 2″ of overlapping carpet wherever the garbage can doesn’t attach to the wood. Read that sentence again, it’s important. Then cut the carpet and staple using the upholstery technique above. It should look like this underneath:
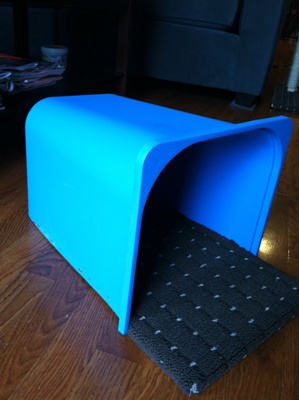
9. Now attach the garbage can to the third tier by driving lots of staples through the edges of the garbage can into the sides of the third tier (see the photos above and below):
10. Now, attach the third tier to the top of the long post by using 2-3 screws. Staple a cat toy to the side of the garbage can, if desired. Here is the final product:
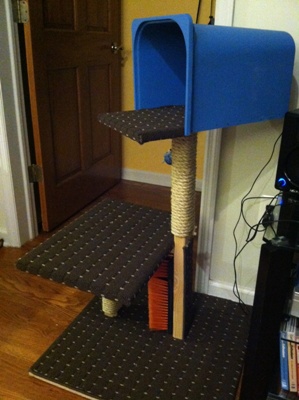
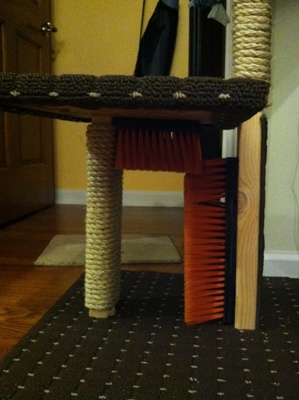
11. And here’s a good view of the “cat wash” station:
More Burt
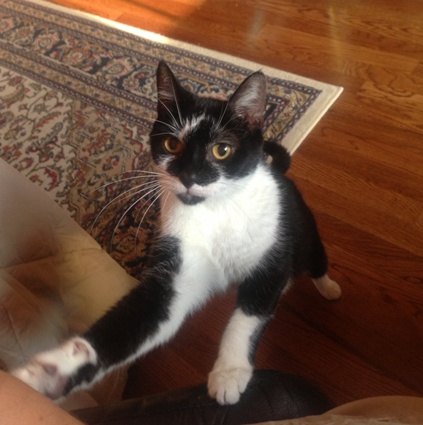
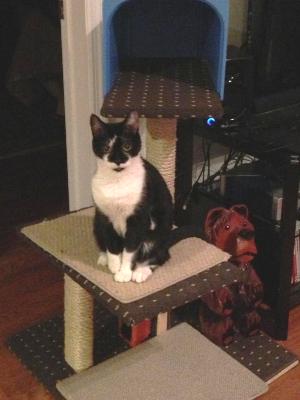
Here’s Burt using the cat tower:
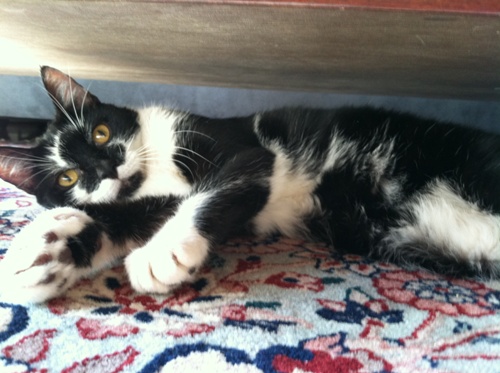
Here’s Burt chillin’ under the coffee table:
 Print
Print Email
Email


This is awesome! Welcome to Burt, and I love the DIY work :)
Thanks Liz! Burt’s happy too =)
PBB –
You’re truly a man of many talents!!! I don’t even have a cat and I want one of your tower creations!
Haha, thanks Debbie! It’s quite the showpiece, right? I don’t tell people I have a cat, I just tell them it’s a piece of modern art I purchased.
That is the best kitty palace I think I’ve ever seen! I bet Burt loves it!!! And I think I love Burt. What a handsome little guy!
Haha, thanks Amy. Burt is a cheery little guy, I think he likes knowing that a famous celebrity was named after him =]
Burt is just adorable. That “chillin” picture is a total keeper. Don’t feel badly about not having a dog – in my building (a dog friendly building) the harassment from dog haters is crazy.
Thanks Giz! Oh man, dog haters? What a shame, have those people misplaced their heart?
I got a cat tree like the one you link to, and it’s not plastic — it’s MDF. And while I didn’t pay $134.99 for it, the cats love it. Of course, I like yours too. :)
This is awesome!! And I love the cat’s name hahahahaha